How to reattach the snapped lead on a 1/2" VHS magnetic tape

Understatement
By Andrew Davidson
on April 4, 2014

Don't let that date confuse you - I took these pictures for this blog post in 2014, and only now managed to dig them up, crop them and post instructions here in August of 2018. Hopefully these brief photo instruction tutorial will help anyone fix and repair the ends of the 1/2" magnetic tape on their beloved VHS and get it playable once again!

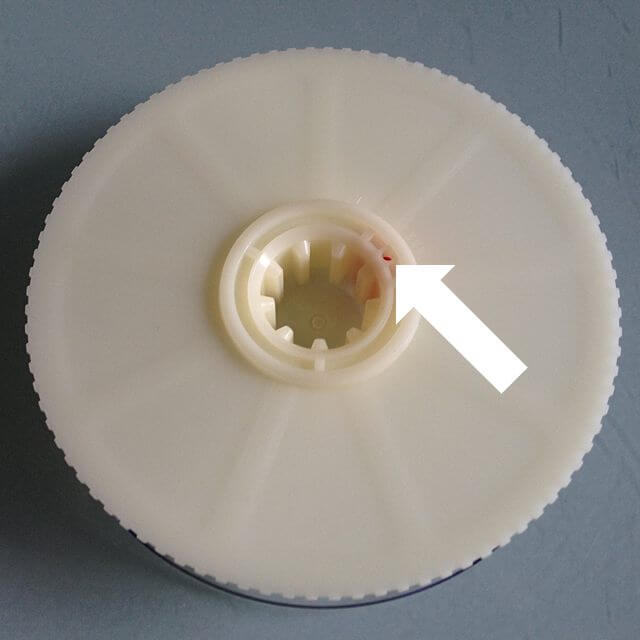
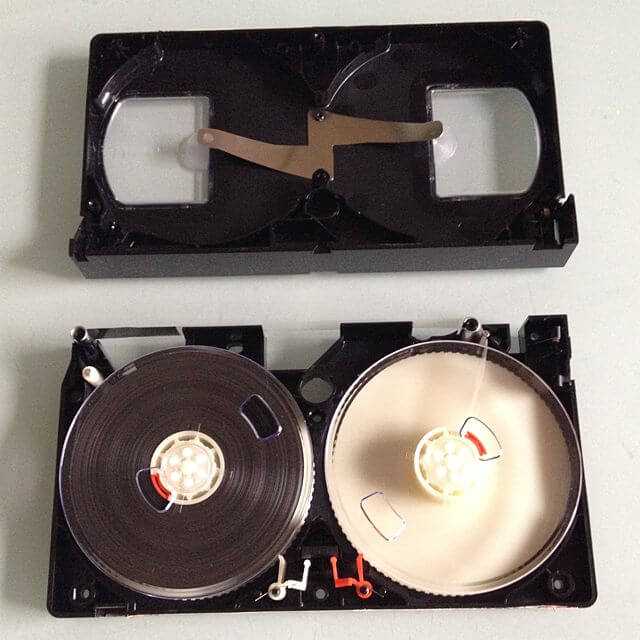
If the tape has snapped in two in the middle of the tape, I suggest you follow our cassette tape fixing instructions for our exclusive upside-down sticky tape method to repair the snapped magnetic tape. It should work the same for even tape this wide, with the exception that longer tears might be hard to repair. This instruction deals with other VHS-specific breaks - when the tape ends come off the plastic reels. This usually happens when an overzealous VCR will rewind or fast forward too quickly toward the end and pull the tape right off the reel. It's a rare occasion, but considering how many VHS tapes I convert every year for my customers, this happens more often than you'd think.

tools

Tools Needed

You'll need some basic tools to do most any work on VHS tapes, as they are standardized to be very easy to open and maintain. You'll need a small phillips head screwdriver, a pencil with an eraser, an xacto knife (maybe), and a sacrificial paper clip. The xacto blade use is quick and painless - I run it along the seam between the top and bottom halves on the faceplate where the sticky label has been placed. This way, I've pre-cut the label in two on the seam, and therefore the label won't hold the two halves of the tape together, and you don't risk ripping and tearing the label so it remains readable after the fix.

1topscrews

Shell overturned, screwdriver at the ready.

There's a series of 6 small phillips head screws in the bottom corners and center of standard VHS tapes. They all need to be removed. They can be loosened and left in the holes, or pulled completely. They should all be the same size and length, and therefore interchangeable. Some VHS tape designs may call for more or less screws, but you should be able to see all of them on an upturned tape. Once removed, you can gingerly lift the bottom half of the tape straight up to separate the shell.

2halves

VHS split in Two

The (heavier) video reels should stay in the lid when you pull off the bottom like I did here. Depending on the design of the VHS tape, you may dislodge the reel locks (the white & red bits of plastic on the bottom half), which can be easily reseated. There's plastic and metal posts that are used to guide the tape through the cassette mechanism that also may have fallen off, and can be re-seated on the bottom half for assembly.

3reelsout

Magnetic Tape Reels Out

Pull the two video reels and set them clear-sided up as they were in the tape to ensure you don't twist the tape. The left reel is where we need to re-attach the pigtail, which has a clear 1/2" leader. Cheaper tapes forgo the clear plastic leader and might be attached directly to the center reel as magnetic tape. You can see in this detailed picture that there's a red tab that holds the leader to the center of the reel. The tape has snapped at the seam, so we need to pull and re-seat that red tab to fix it.

Flipping the empty reel over, you can see the tiny hole where you can push to remove the red tab through an opening on the top of the reel. Pull out your paper clip and straighten one end to act as a poker so you can dislodge the red tab. Our following pictures show clearly:

5tabpunch

Hole for removing Red Tab

6pokey

Tool for removing Red Tab

7punchpokey

Poking Tool into Hole for removing Red Tab

8poppedtab

Success!

9relead

New Lead behind Red Tab ready for Seating with Pencil

While we removed the red tab via the top of the reel, we're going to reapply it via the side using a pencil with an eraser. String the clear lead around the tape center (no twists!), then push the red tab into place using the pencil eraser for leverage and friction, squeezing the clear leader behind it. It should snap into place (it might take some effort) before the two reels are now joined by a magnetic umbilical cord. There may be a pigtail sticking out slightly, but it will not affect the tape winding or unwinding in the least.

10puncheddown

Seated Red Tab

11tapeleads

Outside White roller, outside Metal roller

Put the reels back in the bottom half of the clamshell case, making sure to feed the magnetic tape properly through the rollers - it should be pretty obvious, but note there are places that caress the tape to remove static.

Once both reels are seated and the tape is wind properly through the rollers across the front and back in, you can gingerly seat the top lid down, ensure it's seated properly and feels correct, before turning it over and re-inserting the screws to hold the clamshell together.

12almostdone

Packed, taunt and ready for lid

I like to fast forward and rewind the VHS tape fully to ensure it's loose and ready for playback, and you should expect perfect video results!

Hopefully this short pictorial / tutorial should assist some other person looking to save an analog VHS video relic from the recycle facility! We gladly backup any and all VHS tapes (even copyrighted ones - but only one copy) for our nationwide list of American customers.

Don't forget, if you don't want to fix your broken VHS tape, but still want to save your precious home VHS memories onto long-lasting DVD or MP4 video files, you can't go wrong sending it to us, where we'll fix it for free!