I've built a few wood box rack mounts that are very durable and strong, and hold hundreds of pounds of equipment. It all starts with inexpensive rack rails that will be the backbone of your design. Then, it's a few flat, carefully squared boards cut from any sort of plywood, then pre-drilled and screwed into a simple box.
DIY Wood Rackmounts
Understatement
By Andrew Davidson
on February 25, 2017
Parts Needed:
- (2) 3/4 Plywood (Top & Bottom) - cut to 19.125" x 16"
- (2) 1/2 Plywood (Sides) - cut to (Rack Length + 3") x 16"
- (1 Set) Metal Rack Rails (Amazon Link to 6u, 8u, 12u, 16u)
- (2) 1"x2" Pine (Baseboard) - cut to 19.125" length
- (6-8) 1" 1/4" Bolts/Lock Washers/Nuts
- (6-8) 2" Wood Screws
The top and bottom of the rack should be cut from 3/4 thick wood. I generally use standard plywood, and cut the top and bottom at the same time. These two pieces should measure 19.125" x 16". You can go slightly shallow or deeper on the 16" side (min 15" max 18"), as this is the depth of the entire rack. If your rack units are very deep, you might want to add an inch or two to the depth. I chose 16" for how easily it fits on a 48" board.
For the rack sides, I use thinner, lighter wood like 1/2 plywood, pressboard or laminate, as the rack rails we'll be attaching do much of the work. The width is the same as the top and bottom (16"), then the height is calculated as the rack rail length, plus a 1.5" baseboard, plus 3/4" header and footer board.
Prep the Sides with Measurements
There is a bunch of holes that need to be pre-drilled in the sides. In order to save time and ensure consistency, we'll stack the two sideboards with the outsides together. We'll draw on the top, then drill through both boards.
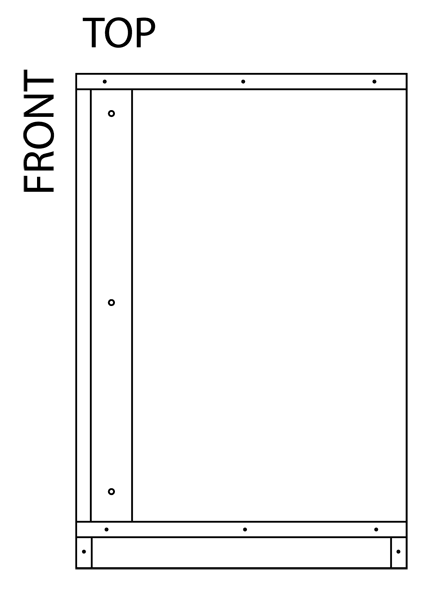
Stack the 3/4" header on your sides at the top, at a 90 degree angle, and line it up with the top edge. Ensure it's perfectly lined up, then draw a pencil line under the bottom to mark. Put the header aside, and draw another pencil line a half-inch back from the front (rack facing you) edge. Your rack rails will lay on this line, and depending on how far your equipment extends past the front plate, may not allow flush mounting. Check your rack gear first, you can move them back now during the design phase.
Leaving 3/4" room from the top edge place up a single rack rail on the board, then use a pencil to mark three holes that you'll drill to bolt the rack rail to the plywood sides. Mark the bottom edge of the rack rail, which should be around 2.25" from the bottom.
Stack a 1"x2" Pine board along the bottom edge, then the 3/4" plywood aside it, to see if there's room for them and the rack rail. See the illustration to the left for a side-profile of the box. The top and bottom pieces as well as the rails are in between the two sides.
Drill through both side boards where you marked the holes. You can test mount the rack rails onto each side, using the 1/4" Bolts/Lock Washers/Nuts.
Drill for Top and Bottom screws, and kick-board front and back. Baseboard also acts as a small but subtle cross-brace for square. If you so desire, it also helps hide a easily addable set of casters to make your new rack simply roll around.
