Inkjet printing is the rage these days. Getting cheap prints means buying a Continuous Ink System, or CIS, and ink in bulk to save money over the high cost of name-brand ink cartridges. Inks in bulk are way cheaper than from in cartridges, but it's still pricey. 32 oz. of ink runs around $50. (compared to cartridge rates of $22 per oz.)
Here's the skinny: Most Inkjet printers basically use the ink to blow out the very tiny print heads from occasional clogs. If you're using cartridges, you can easily blow through volumes of ink by doing repeated cleanings (which is a recommended practice).
This ink is dumped into cotton waste pads in the base of the printer, where it will eventually evaporate, but not without leaving the dye residue. The Printer keeps tabs on the amount of ink it dumps into it's internal waste pads, and will require service to replace them after a time it deems necessary.
So basically, my printer has an expected day when it will stop functioning due to requiring a technical service. I'd rather avoid that, and save even more money. So the solution is to also move the waste pad/tank outside of the printer as well.
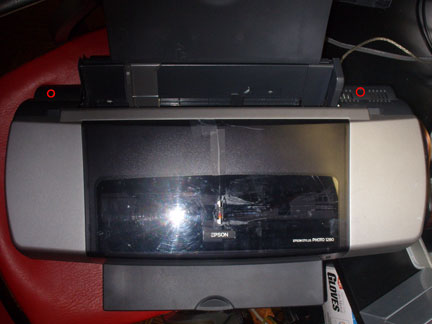
Remove the top of the printer. There are 4 screws, highlighted in the photos below. Once removed, the entire top assembly removes, with some jiggling.
Here's the 2 screws in the front:
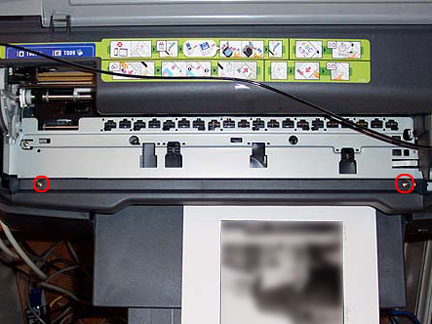
and the 2 in the back:
Turn the printer to the side where the print head parks. There is a plastic tab covering access to the waste tube. It's merely stuck on like a sticker. Remove it.
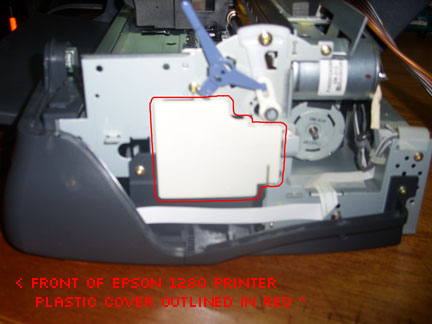

See the tiny white rubber tube in that hole? That's the waste tube. It dumps into the waste pads directly below it. You'll note there are 2 cottony pads soaked with ink.

Detail view, below is the (very short) path it leads.
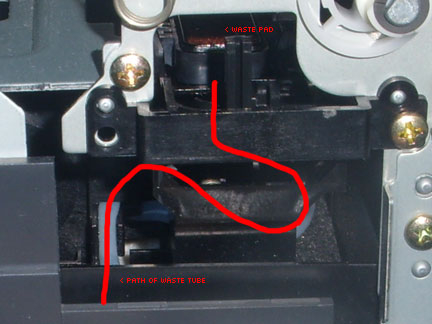
We're going to attach our platic tubing to the end of the rubber tubing, run it through this simple maze inside the printer.
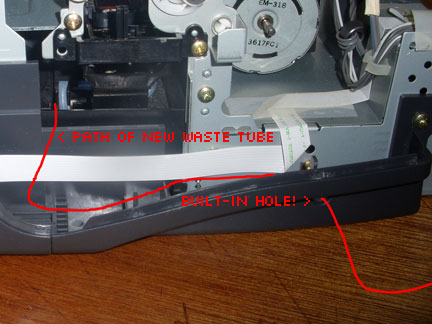
To an external tank, like this.

You'll note I keep the bottle on it's side, to keep the level of ink below the waste pad inside the printer. Pictured is a recycled HDPE 16oz Bottle, which I used initially, until I found it leaks through the cap. I've since switched to a top-feeding waste tank made from an old plastic food container, so no more messy ink cleanups!
You'll still need to keep the height of the top of the waste tank lower than the top of the dumping pad in the printer, though! The ink will settle to lowest ground, and you don't want it coming back up into the dumping pad in the printer.
Put everything back together (pretty simple, huh?), and get back to printing!
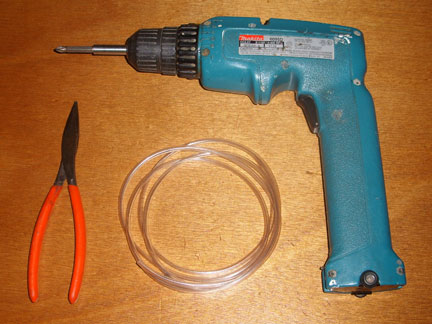
I should point out, I gloss over attaching your tube to the internal tube. It's a pain in the a**. There are 2 small holes to work through, one above, one to the side. It's a bit like fixing a car engine through the glove box.
I stuck the needle-noise pliers in from the top. Used a pencil to manuver the rubber tube out of it's plastic hold so I could clamp it between the pliers. once it's clamped securely, feed the plastic tube in throught the same side it should exit, and force it onto the end. It's like trying to put a condom on limp, but eventually, it'll slide on. I gave it about a 1/2 inch of overlap.
What do you do with the wasted ink? Mix it with black in a 1:3 ratio for more black ink! (simply add one part waste to 3 parts black ink) It's like saving money all over again!
Once you have the tank in use, when you clean the heads, you can see the huge amount of ink being forcibly ejected by the print heads. The plastic tube will shake with each cleaning, giving you a better idea of the process at hand.
Your printer requires you to install and run some Windows only software to access the internal 'waste pad' setting and reset it. It seems pretty simple to use, according to this site. I've done it before on my Epson R200, it's easy, takes moments, and is free. Links are below:
The only issue being is that you need to install the drivers for said printer on the Windows box before the Utility will even see it. If you are going to load up a virtual machine to do the bidding, make sure it has print drivers, and can access your USB port!
On a side note, I use Sun Microsystem's free and open-source VirtualBox to run virtual machines on my Mac, and it's free for other OS's as well.
We got an update from reader John Vilhauer who said the quick and easy way to reset the print waste pads is with this startup button combo:
You can hold down the paper feed and maintenance buttons while powering on. Wait 'til both lights go solid, then hold the paper feed button again for about 15 seconds. There is also another service reset done the same way except you hold the maintenance button for 15 seconds. Thought you might want to know for future reference...
I was frustrated by the lack of information regarding installing what I assumed would be a simple mod - an external tank to hold waste ink exhausted by the printer when attempting to clean the print heads. Google offered me no help, with the exception of thousands of newbies asking for the same thing.
So, being foolhardy adventurous, I began to disassemble my beloved hard-working Epson Stylus Photo 1280. Found it to be mad simple, happened to have the digital camera handy, plus it eschews planned obsolescence, the worst of all corporate crimes.
written by under on march 22, 2008 (edit june 2). feel free to leave comments/help requests/feedback on our corporate site